Warung Bebas

Friday, September 19, 2014

HTC One M8 Problem and how to fix it.

HTC One M8 Problem and how to fix it

HTC One M8 Data Connectivity and WiFi Problem and how to fix it

  1. The Data connectivity problem with T-Mobile seems like a network problem rather than hardware or software problem.
  2. The WiFi works fine with most handsets. Try to check the password. If nothing works, then try to reset the cell phone and check it again.
  3. If nothing works then visit the retailer or authorized service center.

HTC One M8 Bluetooth Problem and how to fix it

  1. Make sure firmware is up to date.
  2. Delete all previous Bluetooth pairings and try to connect it again.
  3. Rename your cell phone bluetooth.


HTC One M8 Infrared / IR Blaster Problem and how to fix it

  1. Install Universal IR Remote from Google Play for Free and check if the problem is solved.
  2. Make sure you have selected the right TV Model.
  3. Try to reset the cell phone and recheck it.
  4. If the problem is not solved then visit the retailer or authorized service center.

HTC One M8 No SIM Card and Roaming Problem and how to fix it

  1. Remove and re-insert the SIM card and check if the problem is fixed or not.
  2. Try to clean the SIM card tracks on the PCB by using IPA solution or alcohol.
  3. If the problem is not fixed then try to insert different SIM Card and check it.
  4. If the problem is not solved then visit the retailer or authorized service center.
  5. The roaming problem may be solved with the next software update.

HTC One M8 Keyboard Language Problem and how to fix it

  1. Download another built-in Swype keyboard from Google Play and see if the problem is solved.
  2. If you do not want to any other keyboard but just the original default one then you need to open the SMS app then bring up the keyboard and hold the cog button and then  the keyboard settings menu will appear, Tap Keyboard Selection and uncheck the unwanted languages.
  3. Close all the active apps running in the background.
  4. Clear RAM at regular intervals.
  5. Do not open too many apps at the same time.
  6. If nothing change the try to reset the phone.

HTC One M8 Camera Problem and how to fix it

  1. If the camera causes problem in portrait view then try the following steps  -- Log into the Last Pass application  Go to 1. Preferences 2.  Edit App Associations 3.  Select Camera 4.  Change the selection to Do not show fill window.
  2. If you face problems with using the Duo camera then try to do some practice. Try to maintain some distance between layers in an image and it will work fine.
  3. Good lucky..!!

    how to solve and fix Samsung Galaxy S5 Audio problem


    Many users have complained of several problems with audio / speaker and microphone of Samsung Galaxy S5. Sometimes the caller cannot hear the other person and sometimes the other person cannot hear the caller. Sometimes the audio is not audible. 

    Trick on how to solve and fix this problem:
    1. Clear the cache and close any running active application. Also clear the RAM.
    2. Make sure the audio volume is maximum.
    3. Restart the phone if required.
    4. If the problem is not solved then remove the battery and the SIM and again insert them back and turn ON the Cell Phone.
    5. Make sure no external Bluetooth device is paired with the phone. Turn OFF Bluetooth.
    6. If the other person can not hear you then check the microphone. Make sure there is nothing caught in the microphone hole. Use the compressed air pressure to clean the hole.

    Samsung Galaxy S5 Screen Problem – The screen does not turn on.

    Many buyers and users of Samsung Galaxy S5 mobile cell phone are complaining about its screen problem. In many cases, the screen doesn’t not turn ON Automatically when the phone is on STANDBY MODE for some time. The screen just remains black.

    Procedures on how to solve and fix this problem:
    1. Restart the phone or Turn it OFF and and after few second Turn it ON.
    2. If the problem is not fixed then remove the battery and again insert it back.
    3. You may also have to change the Lock Screen Setting. Just go to Settings and select Device. Select the Lock Screen Option and then select Additional Information. Uncheck and turn OFF the setting.
    4. If the problem is still not solved then you may have to Disable the “S Health App and the Smart Remote App. Go to 1Settings 2– Accessibility 3– Vision 4– Dark screen 5– Turn OFF.
    5. Buggy applications can also cause the problem. Check and uninstall.
    If nothing works then Factory Reset the Phone.
    Go to
    1. Settings
    2 – Backup and reset
    3- Factory data reset.

    After Factory Reset your Samsung Galaxy S5 mobile cell phone problem will be fixed up to 99%

    Sony Xperia Z2 Problem and Solution

    Sony Xperia Z2 Problem and Solution

    Sony Xperia Z2 is among the top most selling smartphone  around the world. The cell phone is often compared with Sony Xperia Z1, Sony Xperia Z3, Samsung Galaxy S5 and Apple iPhone 6.
    Recently many Sony Xperia Z2 owners have been complaining about several hardware and software problems. Most common problems and issues with the Sony Xperia Z2 smartphone are listed below:
    1. Overheating Problem.
    2. Speaker Problem.
    3. WiFi Connectivity Problem.
    4. USB Connectivity Problem.
    5. Gaps in the Handset.
    6. Slow Charging Problem.
    7. Tap to Wake Problem.
    8. Call and Notification Volume Problem
    Z2 LET US NOW LOOK THE POSSIBLE SOLUTION TO THE ABOVE PROBLEM

    Sony Xperia Z2 Overheating Problem and Solution
    1. The overheating problem occurs mainly during 4K video recording.
    2. Try to use a high capacity external SD card.Sony Xperia Z2 phone supports up to 128 GB.
    3. Change settings to save videos in the external storage. Do not shoot 4K videos for long time just shoot for very short of time.
    4. Try to avoid using image intensive apps that may lead to several overheating.
    5. Do not open too many applications at the same time and aslo close all applications running at the background.
    6. Also updating software may fix the issue Go to.
    • 1. Settings
    • 2. About phone
    • 3. Software updates
    • 4. System updates.

    Sony Xperia Z2 Speaker Problem and Solution

    1. Check and remove and external elements such as paper.
    2. Check volume level. Make sure it is set to maximum.
    3. Go To 1. Settings 2. Sound 3. Change your ringtone or notification sounds.
    4. Go To 1. Settings 2. Sound 3. Sound effects 4. Sound enhancements 5. Settings 6. Switch ON xLoud.

    Sony Xperia Z2 WiFi Connectivity Problem and Solution

    1. Reboot both your phone and check if the problem is solved.
    2. Check out if the latest version of firmware is installed in the phone. Go to 1. Settings 2. about phone 3. Software updates 4. System updates.
    3. Go to Settings 1. Wi-Fi 2. Press option button / icon 3. Tap Advanced 4. Tap Keep Wi-Fi on during sleep 5. Select always.
    4. Make sure you are within reasonable range from the WiFi router and remove any protective case from your phone. Remove the phone from docks or stand to see if the Wi-Fi signal strength improves.
    5. Make sure potential interfering devices or appliances are not placed close to the Wi-Fi router.
    6. Make sure that your password is correct and that it does not contain any special characters.
    7. Set the IP manually. Go To 1. Settings 2. Wi-Fi 3. Tap and hold the network you are connecting to 4. Select Modify network 5. Tick the Show advanced options box 6. Select Static under IP settings 7. Save.
    8. If none of the above tips help, try to connect to another network to see if it works.
    9. Turn OFF battery saving mode and see if the problem is fixed.
    10. Reset the phone to factory settings.

    Sony Xperia Z2 Slow Battery Charging Problem and Solution

    1. Check out the charger cable for any fault. Use another charger and check.
    2. Always use the original charger.Using third-party chargers can cause problems.
    3. Make sure the charger is connected properly
    4. Check out the charging speed using USB.

    Sony Xperia Z2 Tap to Wake Problem and Solution

    1. Make sure the feature is ON. Go To 1. Settings 2. Display 3. Tap to wake up.
    2. Double click quickly on the screen to wake the device up.
    3. click with your fingertip twice in exactly the same spot on the Touchscreen. It works best when the phone is on a hard surface.
    If the problem is not solved then take the cell phone to authorized Sony service

    Monday, September 8, 2014

    Step on How to Add Favicon to your Blogger Blog

    Branding your blog is a good thing and we as bloggers do not really concentrate on it.
    One trick to brand your blog is adding a personalized Favicon to your blogger blogs.

    The favicon is a 16 x 16 pixel image which is placed on tabs and address bar of web browsers.

    By adding favicon you can have lots of advantage, one is that you are branding your blog,
    when some user bookmarked your blog favicon will be there as a label and in browser history it is there too.

    So below is a tutorial which will guide you how to add favicon to your blogger blog.

    How to Add Favicon to your Blogger Blog

    By default, we see a blogger favicon “B”, you can see in the below image.


    To add our personalized favicon first we have to make it first {design your logo first},
    The best way to get a favicon is make your blog initials as a favicon.
     In our blog also we have chosen “TF logo” as our favicon, but it’s entirely up to you how you want your blog favicon to be.
     Favicon should be approximately 16 x 16 pixels in size to be displayed properly.

    Once you have your favicon ready, log in to your blogger blog and select layout and then edit. See below pictorial representation.
    Step on How to Add Favicon to your Blogger Blog

    By clicking on edit a pop up window will open having option to upload favicon file to your blog.
    Press choose file button and locate your favicon which you have just made it and upload it to blogger.
    Now click save to complete the process.
    Step on How to Add Favicon to your Blogger Blog

    Step on How to Add Favicon to your Blogger Blog
    this ts how look after uploading you logo

    Congratulations, you have successfully added a personalized favicon to your blog.
    I hope now you have no difficulty in implementing favicon to your blogger blog.

    How to Unlock or Reset Micro SD Password For Nokia phone

    How to Unlock or Reset Micro SD Password

    Some times it happens that you forgot your Micro SD Password  and you have lots of your important data in your phone.
    So there are two types of methods for recovering the password of your memory card with the help of nokia phone.

    For Nokia s60 1st and 2nd edition phones.

    1. First Install FExplorer in your phone memory.

    2. Got to drive C,there you will find a file called mmc store

    3. Send it to your PC directly and open it in notepad or rename the file.

    4. At the end of the file you will find your password.

    For Nokia S60 3rd Phones, Nokia N-Series and Nokia E-Series

    There is almost no way yet known to hack the memory card password in case of these types of phone but there is a way to do it some of the s60 3rd edition phones and almost all the E-series phones.

    The remote lock option in E-Series phone allows you to unlock your phone by sending a sms.

    The only thing you have to do is to activate this feature by going to
    1-Tools
    2-Settings
    3-Security
    4-Phone and SIM 
    5-Allow remote lock menu. 
    --The password of your memory card will be your remote lock message.

    Lastly you  have to send an sms containing your remote lock message that will automatically change your memory card password.

    Saturday, August 30, 2014

    WiFi setup on the BlackBerry Z10

    WiFi setup on the BlackBerry Z10

    When you are at home it makes sense to connect to your home Wi-Fi network.
    Not only will connecting to Wi-Fi stop you running up any charges if you use a lot of internet
     it will also let you join your handset to other devices or computers on your network without the need for cables.

    Below are the 8 step on how to Set up Wi-Fi

    1. Open Settings
    2. Choose Network Connections
    3. Ensure Flight Mode is Off
    4. Choose WI-Fi
    5. Choose the network to connect to
    6. Enter the Wireless Password key
    7. Then Choose Connect
    8.  Wi-Fi will now connect and show Connected

    9 Step on how to Edit a Wi-Fi Connection

    Editing a Wi-Fi connection will let you change things like your saved wireless password
    1. Open Settings
    2. Choose Network Connections
    3. Ensure Flight Mode is Off
    4. Choose Wi-Fi
    5. Choose Saved
    6. Select the Wi-Fi you wish to edit
    7. Alter the settings as required.
    8. Once complete choose Save and Close
    9.  Your Wi-Fi settings should now be updated.

    steps to follow when you want to Delete your Wi-Fi Profile

    1. Open Settings
    2. Choose Network Connections
    3. Ensure Flight Mode is Off
    4. Choose Wi-Fi
    5. Choose Saved
    6. Select the Wi-Fi you wish to delete
    7. Choose Delete
    8. Confirm you wish to delete the profile.

    Steps on how to Backup and restore your BlackBerry Z10

    Steps on how to Backup and restore your BlackBerry Z10

    BlackBerry Link is the link between your BlackBerry  device and your PC or Mac. You can sync your device to the desktop either through a cable or over the air through a Wi-Fi network.
    When you are using a BlackBerry Link it allows you to:
    • Sync music , videos, pictures and documents between your BlackBerry device and your computer using a USB cable or Wi-Fi network
    • Backup and Restore your device data.
    • Transfer supported settings and data to your device
    • Manage multiple devices that use the same BlackBerry ID
    • Update or Reload the device software
    • Set up a device to remotely access files stored on the PC via the Internet and BBI.

    Install BlackBerry Link


    Install BlackBerry Link

    Steps To install BlackBerry Link:
    1. Download BlackBerry Link
    2. Install BlackBerry Link
    3. Open BlackBerry Link
    4. Give your computer a name
    5. Set up the libraries you want BlackBerry Link to see
    6. Sign in with your BlackBerry ID

    Backup a BlackBerry 10 Device

    Backup a BlackBerry 10 Device

    To back up your BlackBerry 10 device or Playbook running BlackBerry 10
    1. Open BlackBerry Link
    2. Click on the device along the bottom.
    3. Click on the Settings icon
    4. Click on Backup Now

    Restore Data on the Z10

    Restore Data on the Z10

    You can restore an entire device or just part of the data, as in previous versions of BlackBerry Desktop Software. To restore your device to a previous backup follow the step below
    1. Open BlackBerry Link
    2. Click on the device along the bottom
    3. Click on the Settings icon
    4. Click on Restore device data
    5. Select Restore from backup file
    6. Select the data to restore
    7. Click Restore

    Reload a non-working Z10

    BB Z10 - backup restore restore 2

    To reload the operating system for a device which is unresponsive
    1. Open BlackBerry Link
    2. Click on the device along the bottom
    3. Click on the Settings icon
    4. Click on Restore device data
    5. Select Restore from backup file or Restore to factory settings
    6. Click Restore now
    7. DONE!!!!!

    How to update the operating system (OS) on the BlackBerry Z10.!

    How to update the operating system (OS) on the BlackBerry Z10.!

    New OS updates is now available for your handset. To make sure your Z10 stays current, follow this guide to check for and install any relevant software updates.
    You can update your device in two ways, over the air and via BlackBerry Link.
    To update Over the Air (OTA)
    Open Settings
    1. Choose Software updates
    2. Select Check for updates
    NOTE THAT: Updates can be very large files. We recommend you connect to a Wi-Fi network before doing a software update to avoid data charges and guarantee a stable, fast connection.

    To update through BlackBerry Link:

    1. Open BlackBerry Link
    2. Connect the phone via USB
    3. Select the device along the bottom
    4. Then Click the Settings icon 
    5. Click Install update

    Thursday, August 21, 2014

    How to Find your BlackBerry Z10 phone if you lose it..!BlackBerry Z10 tips and tricks

    How to Find your BlackBerry Z10 phone if you lose it..!BlackBerry Z10 tips and tricks


    Everyone has those days when you are about to leave the house and can not find your phone. Where is it? worry out, the Z10 has BlackBerry Protect.

    You can enable this feature from the System Settings menu and once it is switched on, you can use your computer to track the location of your device.

    Log in to protect.blackberry.com with your BlackBerry ID and you will be able to see the exact location, as well as send messages to it, so you can hear the notification sound. You can even wipe all of the content on the device

    How to Type in more than one language when usins BlackBerry Z10..!BlackBerry Z10 tips and tricks

    Type in more than one language..!BlackBerry Z10 tips and tricks
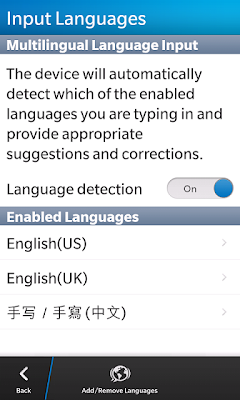
    If you are fluent in more than just English, you may want to install additional languages on the Z10 so that it correctly picks up spelling errors or suggests words in other tongues. Go to

    Type in more than one language..!BlackBerry Z10 tips and tricks
    1.Settings

    2. Language
    and Input

    3. Input Languages

    4. Add/Remove Languages


    5finally pick the ones you want.

    How to set a password lock on your BlackBerry Z10...!!BlackBerry Z10 tips and tricks

    How to set a password lock on your BlackBerry Z10...!!BlackBerry Z10 tips and tricks

    How do you set up a password on your very own BlackBerry  Z10? Well, it's a bit tricky for some, but we have broken it all down for you below. Enjoy!

    1. Wake your BlackBerry Z10 and unlock it.

    2. Swipe down from the top of the screen.

    3. Tap Settings.

    4. Now select Security and Privacy.

    5. Finally, tap on Device Password and toggle the switch.

    6. Enter a password and hit save.

    7. That's it! Your BlackBerry Z10  is now secure

    8. Remember you must now enter this password every time you unlock your Z10.

    Thursday, August 14, 2014

    How to Clean Your Computer Keyboard.!!

    How to Clean Your Computer Keyboard.!!

    1. Turn off the computer and unplug the keyboard. Turn the keyboard upside down and gently shake it. Most of the dust and crumbs will fall out and take a can of compressed air and blow it into and around the keys.

    2. Take a cotton swab and dip it in rubbing alcohol. It should be damp but not wet. Run the cotton swab around the outside of the keys and the tops of the keys. If you have a laptop, follow the same step but take extra care with your machine. When finished plug the keyboard back in and turn your computer on.

    3. If a spill happens on the keyboard, immediately turn off your computer, disconnect the keyboard, and flip it over. While the keyboard is upside down, blot the top with a paper towel, blow compressed air between the keys and leave it to air dry for at least tree to four hours..

    4. Notebook spills need more attention because liquid can easily penetrate past the keyboard and damage different internal parts especial circuit board.

    5. If a notebook spills, turn the computer over immediately, turn off the computer and remove any external power source {power cable} and other items plugged into it and also remove the battery. Blot the notebook with a paper towel, turn it upside-down to air dry for at least tree to four hours.. If after leaving the notebook upside-down for a time the notebook does not start or work correctly Contact a computer expert for a Technical Support.

    6 Steps on How to fix laptop spacebar key,!


    1. Click Start and select All Programs.
    2. Click Accessories and select Ease of Access.
    3. Click Ease of Access Center.
    4. Click Make Keyboard Easier to Use.
    5. Click Set Up Sticky Keys. Deselect the check box that says Turn on Sticky Keys When Shift is Pressed Five Times. Make sure the box that says Turn on Sticky Keys is not checked. Click OK to save your changes.
    6. Click Set Up Filter Keys. Unchecked the box that says Turn on Filter Keys. Click on the check-box next to Turn On Filter Keys When Right Shift Is Pressed For 8 Seconds to deselect it. Click OK to save your changes.
    Click OK again to save all of the keyboard accessibility changes you have made.

    Friday, August 8, 2014

    Five steps on how to Clean Your Ball Mouse


    1. Turn off the computer and unplug the mouse.

    2. Open the bottom and remove the ball.

    3. Wash the ball with water and let it air dry.

    4. To clean inside of the mouse, dip a cotton swab in rubbing alcohol and rub all of the components. Scrape hard to remove grime with your fingernail.

    5. Blow air into the opening. Replace the ball and the cover and when finished plug the mouse back in and turn your computer on.

    Tip on how to Change the Keyboard input Language in Windows XP:

    Tip on how to Change the Keyboard input Language in Windows XP:

    You can edit your documents in multiple languages by changing the language in which you type. Input languages are included with Windows but you need to add them to your list of languages before you can use them.

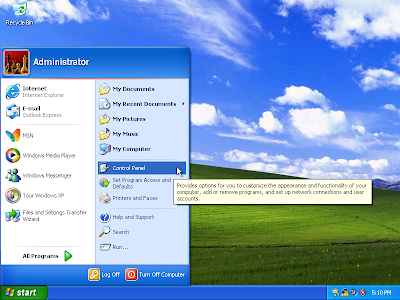
    The following are simple step on how to Change the Keyboard input Language in Windows XP:

    1. Click Start and then Control Panel

    2. In Control Panel  if you are in Category View click on Switch to Classic View

    3. Open Regional and Language Options.

    4. Click on the Languages tab.

    5. Under Text services and input languages, click on the Details button.

    6. Under Installed services, click Add.

    7. In the Add Input Language dialog box,you may choose the input language and keyboard layout or Input Method Editor you want to add.

    8. Click OK twice. You should now see a language indicator in the System Tray .There you can switch between different input languages pressing the Alt + Shift keys

    Steps on how to add an input language on Windows Vista

    Steps on how to add an  input  language  on  Windows  Vista

    You can edit your documents in multiple languages by changing the language in which you type. Input languages are included with Windows but you need to add them to your list of languages before you can use them.

    The following are simple Steps on how to add an input language on Windows Vista

    1. You need to Open Regional and Language Options by clicking the Start button , clicking Control Panel, clicking Clock, Language, and Region, and then clicking Regional and Language Options

    2. Click the Keyboards and Languages tab and then click Change keyboards

    3. Under Installed services, click Add

    4. Double-click the language you want to add, double-click the text services you want to add, select the text services options you want to add, and then click OK

    Tuesday, July 29, 2014

    Mobile Phone Heating Problem and Solution

    Mobile Phone Heating Problem and Solution

    There are many situation when a mobile cell phone of different brand like LG, iPhone,Nokia, Micromax, China Mobile Phones and Samsung may get heated.

    This can happen inside the mobile phone especially software. There can be different reasons and sign of this heating problem. The following are the reasons of Mobile Phone Heating Problem and its different solutions.

    1. Check if the mobile phone gets heated when a particular application is running or the heating happens always. Check the heating point and running application status with normal status.

    2. Upgrade the mobile phone software or operating system to the latest OS. This one may solve the heating problem.

    3. Many smartphones like Nokia Smartphones,Samsung Galaxy series, iPhone and Blackberry and even the China Mobile Phones get heated if too many applications are running at the same time. This is because the processor has to work more than its capacity at the same time.To solve this close all the applications and try to run one application at a time to avoid mobile phone heating problem.

    4. If heating happens then there is some internal hardware problem. Most Mobile phone service centers and mobile phone repairing experts will change the PCB or Logic Board to solve the heating problem.

    Friday, July 25, 2014

    How to Use Samsung Galaxy S5 as your TV Remote

    How to Use Samsung Galaxy S5 as your TV Remote


    Technology has changed the world but TV remotes are stuck in the past.
    Use your Galaxy S5 as a TV remote for a more rich and smart viewing experience.
    The following are four step on how to set your galaxy S5 as a TV remotes

    1. Open the App Drawer

    2. Select Smart Remote

    3. Press the remote control in the top right

    4. Follow the instructions  on screen

    Enjoy your enhanced entertainment experience

    Samsung Galaxy S5 Buttons Shortcuts.!

    Samsung Galaxy S5 Buttons Shortcuts.!


    1. Home Button [tap]– return home from any screen

    2. Home button [triple tap] – Accessibility options

    3. Home screen [pinch] – wallpapers, widgets, home settings

    4. Home button [double tap] – S Voice

    5. Home Button [hold] – Google Now

    6. Back Button [tap] – previous screen

    7. Back Button [hold]

    8. Multitasking Button [tap] – open recent activities

    9. Multitasking Button [hold] – access settings and menus in all apps

    10. Power button [hold] – change modes {off, airplane, restart, emergency} and sound

    11. Power button then Home [hold]- take a screenshot with the Galaxy S5

    12. Power button [tap] – put screen to sleep and wake it up

    13. Volume [then tap gear] – customize sounds

    14. Triple Tap Screen – zoom in and out on any screen

    Turn the triple tap home for accessibility feature on in Settings
    -- Accessibility
    -- Direct Access

    Tricks on how to Improve Galaxy S5 battery life


    SHOW BATTERY PERCENTAGE

    It is tough to conserve battery power if you do not know when you should be conserving. By default, there is a battery icon in your notification area but no indicator of exactly how much battery percentage you have left.
    You can easily turn this on by moving to
    1- Settings
    2- Battery
    3- Show Battery Percentage – it should now appear in the upper right of your screen at all times.

    TURN OFF UNUSED BATTERY HOGGING FEATURES

    Not everyone uses the same set of features which is why options and settings exist in the first place. However you may find that a lot of features are turned on by default that you are not using and will never use  yet continue to run in the background  sucking away your precious battery life.
    Here are some settings we recommend you turn off and where you can find them:

    1. MOTION GESTURES
    Turn all of these off in Settings Motions and gestures. There are 5:
    [1]Air Browse
    [2 ]Direct call
    [3] Smart alert
    [4] Mute/pause
    [5] Palm to swipe capture.
    Some people may like Direct Call and Mute/pause, but we most prefer turning all of them off.

    2. SMART STAY
    this keeps your screen on while you’re looking at it which obviously needs to continually check to see if you’re looking at the screen. Neat feature but most won’t find it required. Settings > Display > Smart Stay.

    3. AIR VIEW
    found just below Motion Gestures in Settings
    -- Air view.
    --It offers a tool-tip style hover features that you will rarely  use.

    4. TURN OFF BACK BUTTON LIGHT
    You know how the back button and the multi-tasking button to the left and right of the home button illuminate when you press them? You can hide those lights completely while keeping full functionality of the buttons. Kind of neat and an option I’ve grown to love. Settings > Display > Touch key light duration > Always off.

    TURN ON BATTERY SAVING FEATURES

    There are a handful of Galaxy S5 settings that are designed specifically for saving battery life in certain scenarios. Here are some that we recommend turning on and where you can find them:

    1. Auto adjust screen tone to save power.
    This display setting will adjust your screen done depending on the current picture to save battery life.
    -- Settings
    -- Display
    --Auto adjust screen tone.

    2. Keep location on, but turn GPS Off.
    Some people like having access to location settings 24/7 but GPS can be one of the biggest battery hogs. Samsung allows you to rely on Wi-Fi and mobile networks to locate you with Power saving mode. It is less accurate but it definitely extends your battery life.
    --Settings
    -- Location
    -- Mode
    --- Power saving.

    3. Always allow Wi-Fi Scanning.
    For the above to work correctly your phone needs to always be scanning for new networks. You need to turn this on by going to
    --Settings
    --Wi-Fi
    -- Wi-Fi Settings via 3 Dots
    -- Advanced
    --Always allow scanning. Keep in mind that these two features will use MORE battery life than simply turning off location and wi-fi scanning altogether, but if you need location, it’s more efficient than GPS.

    PREPARE FOR THE WORST

    If you know your battery life is going to enter critical condition territory and you want to protect it in advance, Samsung has added two new features on the Galaxy S5 called Power Saving Mode and Ultra Power Saving Mode.

    POWER SAVING MODE
    Lets you adjust a number of settings to create a phone profile that conserves battery. Whenever battery life becomes a point of contention, turn it on and it will restrict your phone’s performance with battery in mind. It will block background data, block certain apps, and turn your phone gray scale. It is essentially a “start saving battery” switch that effects a lot of settings in your battery’s favor.

    ULTRA POWER SAVING MODE
    Offers the same type of functionality but it is much more severe. When you turn it on it will block your access to all apps except for up to 6 allowing you to receive calls and texts but pretty much preventing everything else. You are given information about how long your phone can last in this mode and the numbers are pretty impressive. If you are in a jam, Ultra Power Saving Mode could really save your you-know-what.
    You can find both of these features in
    --Settings
    --Power Saving Mode
    --in the bottom of the Device category.

    Saturday, July 12, 2014

    LCD Monitor Repair ...!! Troubleshooting LCD Monitors

    LCD  Monitor  Repair ...!! Troubleshooting  LCD Monitors
    LCD monitor troubleshooting is a step-by-step process wherein you eliminate prospect
    ive problem sources. If you are using an LCD monitor, you need to know how it works and what all are the troubleshooting methods that can be used if it functions abnormally. In the following section of this article, you will get to know about simple steps regarding LCD parts and repair.

    TROUBLESHOOTING STEPS FOR LCD MONITORS

    OPERATING SYSTEM
    There are some LCD issues that are partially related to the operating system, such as a flickering screen. For examining such issues, press the 'on' button on the CPU, and check if you see any problem before the OS boots. If you observe the problem when the PC is booting, the monitor is at fault. But if the problem is not observed until the OS boots, there may be an issue with the drivers, and you need to check the display settings or reinstall the monitor drivers. You also need to check if the problem lies in the video card. Try to use another LCD monitor with the computer, if it works fine, then there is a possibility of driver issues. If the problems are still persistent with the replacement monitor, the video card is the culprit and needs to be replaced.

    POWER SUPPLY
    LCD monitor troubleshooting firstly requires some level of patience. If the monitor doesn't work, the primary thing you would need to do is to check if everything is plugged in properly. Ensure that the power cord is decently connected to the power source. Also examine if the cord which connects the monitor to the CPU is properly connected. You may even remove all power and CPU connections and put them back again in their respective sockets. But before doing so, just make sure that you know which cable needs to be connected in which socket. Also make sure that the power is switched off when you are in the process of removing and connecting the cables. In case of a working monitor, if the display is disturbed or there is a change in the picture quality when you touch or move the cable, the cable is at fault and needs to be replaced. If the monitor is working fine but goes out after the window loads, the graphic drivers are the culprit. You can try reloading the latest graphic drivers for solving this issue. To carry out the driver installation process, you will need to boot in 'Safe Mode'.

    OTHER COMMON PROBLEM
    Some of the other problems with LCD monitors may include 'dead pixels', which are pixels that only display black or white colors regardless of the displayed image. If a larger part of the screen is covered with such pixels, you can do nothing to resolve the problem other than buying a new monitor. However, this type of problem is rarely found nowadays. If the screen is showing a lower picture quality, you may just need to check the selected resolution. The resolution settings may also be adjusted if the text is not displayed efficiently. Another problem that can be encountered with the LCD screen is a green or pink shade on the display. In this situation, the ribbon connector cable of the laptop may be at fault. On an LCD computer monitor, the monitor cable is to be replaced to rectify this problem. Replacing the connecting cables even solve the problem of monitor flickering.

    If the monitor does not work even after following all LCD monitor repair steps, then the last option would be taking assistance of a computer hardware engineer. If the monitor's condition is really bad, the engineer might even suggest to replace the monitor. For proper functioning of an LCD monitor, it is recommended to keep it covered to prevent dust from entering.

    What you need to Look for When Buying a Monitor.??

    What you need to Look for When Buying a Monitor.??

    If you want to get the best out of your computer, a good monitor is where you begin. So the first question to be resolved is how to distinguish among the various flat-panel display monitors that have inundated the market and pick one that is perfect for you.

    Buying the Right Monitor

    Flat-panel monitors now come with color-calibrating hardware and software which put them at pair with the good old CRTs in terms of color quality. What is more  they are energy-efficient too. Here is a list of basic things you need to know when you set out monitor shopping.


    VIEWING ANGLE
    First you need to consider is the viewing angle. Well if you happen to be the only person viewing  this point can be overlooked but if you have got multiple viewers the viewing angle becomes crucial. Zero in on models that will give you a 170 degree angle as people looking at the monitor from either corners will be able to get clear views.

    CONTRAST RATIO
    The contrast ratio determines the richness of color on your screens. The contrast ratio measures the difference between the brightest and darkest pixels on the screen and a higher contrast will give you a richer image in terms of color and the ratio of 1000:1 would be decent enough followed by 500:1 or 700:1.
    SCREEN RESOLUTION
    The screen resolution has an important role to play in the visuals. Every monitor has a preset resolution that gives you the best display possible. If you lower the resolution from its preset value to sharpen displays all you get is a blurred version. A standard 19inch monitor normally has a resolution of 1280x1024 pixels, while a wider 22inch one will support 1680x1050. Large-sized models like the 30inch ones or bigger will support 2560x1600 pixels.

    MONITOR CONTROLS
    Monitor controls are something that we always overlook while buying never realizing their importance until we actually have to use them. Yes, I'm referring to those buttons that allow you to fiddle with the colors, contrast, brightness, menus and even the volume on models with attached speakers. Easy accessibility to these controls and their user friendliness should be tested before making a purchase.

    RESPONSING TIME
    There's this thing called the response time and it tells you a lot about the picture quality. The response time refers to the speed at which the screen pixels react to change. Monitors with slow response times give you a blurred image or leave a trail. If you are a light browser, this will not affect the picture quality too much, but the difference will be evident when you'll watch a video or a movie. For regular users, a speed of 16 milliseconds should be fine, whereas for multimedia users, 12 milliseconds is the norm. Gaming fanatics are usually happy with 8 milliseconds or less.

    ADJUSTMENTS AND SIZE
    Size is another important aspect, and so are physical adjustments. You'd obviously be keeping your desk space in mind, but refrain from buying a big monitor only because it looks good. You need to pay more attention to the width of your desk the distance from which you'd be viewing it from. Also, check if it has height adjustments and swivel features as they are useful additions.

    PORTS
    Ports matter a lot,. Some of you may own computers that have a graphics card with a digital output, so make sure you pick a monitor that has a DVI input. Digital monitors do have a VGA connection as well, which comes in handy if you've got a dual-monitor plan. Movie fans should look out for composite inputs, which lets them connect their DVD/Blu-ray Disc players. HD content is all over the place, so you'll get a lot of models with HDMI connectors and it really makes sense to go in for it. Consider having a USB port too.


    LED or LCD
    The LED wins hands down when it comes to color quality but there are many for whom this is absolutely immaterial. When compared with the LCD it is also thinner, lighter, gives you a better contrast ratio, and maintains its color accuracy for a longer period. However all good things come with a hefty price tag, so if you have got the budget, no harm in splurging.


    Monday, July 7, 2014

    How to restore Huawei u8650 to its factory settings.!

    How to restore Huawei u8650 to its factory settings.!

    BELLOW ARE STEPS TO FOLLOW
    On How to restore Huawei u8650 to its factory settings.!

    1. Have your battery fully charged.

    2. Turn OFF your cell phone if you can.

    3. Remove the battery and way a few second.

    4. In the mean time you can eventually remove your SD card so that you can be sure nothing will be deleted on it.

    5. Plug it in again.

    6. Press and hold both Volume up + Power button at the same time.

    7. Use volume Up and Down to navigate and select "Factory reset".

    8. Validate with power button.

    This process will hard reset your phone and It may take a 10-15 minutes

    How to restore your Huawei Ascend Y100 to its factory settings.!

    How to restore  your Huawei  Ascend  Y100  to  its  factory  settings

    STEPS TO FOLLOW
    On How to restore your Ascend Y100 to its factory settings.!


    1.First of all Remove and replace the phone's battery.

    2.Then Hold down the Power and Volume Up buttons simultaneously for approximately 5 to 10 seconds and Release both buttons when you see the Android logo. This will access the blue unlock/reset menu.

    3. Once you have reached the unlock or reset menu, scroll down, using the volume keys and select ‘wipe data/factory reset’ by pressing the Power button.

    4. When prompted, select ‘Yes -- delete all user data’.

    5. When prompted scroll to and select reboot system now.
    Your phone will then reboot to its factory settings with all security locks removed.

    HOW IT WORKS

    1. If you are unable to access the settings menu of your Huawei Ascend Y100 you can use the volume and power buttons to restore it to its factory settings

    2. This reset method is especially useful if your phone continually freezes or fails to respond or you have forgotten the security locks you have set up to access the phone

    3. Restoring your Huawei Ascend Y100 to factory settings will wipe all data from your phone

    4. The factory settings reset will not delete any data saved to your SIM card

    Sunday, July 6, 2014

    Computer Display Settings...!!!

    Computer Display Settings
    The display settings of your computer determine how the screen will appear to you. The desktop background and the screen saver appearance this will depend on the ones that you fix.

    The options that are available for these settings depends on the operating system that you are using. If you have the newest and the latest operating systems there will be many options available to adjust them on the computer monitor.

    The most good thing about being able to reset the settings is that, you can add a personal touch to your computer machine. The way the computer physically looks to you can be determined by adjustments which you have made on your desktop computer, laptop, or notebook computer.

    Before you begin the process of actually adjusting the settings you must know how to access the display settings dialog box. For this you need to press the right click button on an empty space on the screen. From the resulting box that pops open you need to select the properties option.

    AVAILABLE OPTION
    You will find that the dialog box thus opened contains five general tabs on the top. They will help you adjust your display and solve all the related problems.


    BELOW ARE THE AVAILABLE TABS


    THEMES:
    This option allows you to choose a theme out of an existing collection of background colors for your applications, sounds when you click on certain buttons the way the icons look on your screen and many other elements. There are a few preset themes available with every operating system, and you can even download new ones online, in order to further personalize your monitor.

    DESKTOP:
    This option allows you to decide the background picture on your desktop. You can choose one of the many preset pictures and you can add your own pictures and also you can download some pictures online too. The browse button allows you to find the desired picture on your hard drive and then select it. You can also choose its position on the computer screen. The three options available to you are stretch, center, and tile.

    SCREEN SAVER:
    This tab allows you to decide what the type of screensaver, which will be visible on your screen, if it's left idle for a stipulated amount of time. You can also decide this particular time from this tab. There is also an option available for you to preview the screen saver, before you actually decide on one.

    APPEARANCE:
    It helps you to choose the appearance of your various screen colors and fonts. Three options are further available in this tab: windows and buttons, color schemes, and font size.

    SETTING:
    It allows you to adjust things like display resolution, color, and other technical troubleshooting tips. Some advanced changes may require you to restart your computer and it is imperative that you do so immediately in order for the changes to take place.

    Operating this dialog box is a fairly simple task, and it enables you to enhance your viewing experience while working on your computer and the more you change your display settings the easier it will be for you to readjust them in the future.

    6 Ways to Increase Download Speed in your machine..!!

    6 Ways to Increase Download Speed in your machine..!!

    1. INTERNET CONNECTION
    The first thing that you need to know is the Internet connection. If you do not have broadband Internet  then you should get it since it is much faster than the old dial-up Internet connection. If you are already on an active cable connection you may ask your Internet Service Provider (ISP) about more advanced options. The Internet speed is obviously the most vital thing; the faster it is, the better will be your download speed.

    2. ANTIVIRUS SOFTWARE
    It will carry out regular updates and a security scans to protect your machine. While these processes are going on the entire machine will run much slower than normal. This is something that is unavoidable, so you must ensure that your downloads and scans are not functioning at the same time.

    3. SELECT FIRST FILE TO DOWNLOAD AMONG OTHERS
    If you are downloading a lot of files at the same time, all of them will be running at slower speeds. all you need is to decide which one type of download is more important than another  and pause the rest till the most crucial one is completed. The more you prioritize your downloads, the faster they will be completed.

    4. DIFFERENT RUNNING PROGRAM
    Shut down all the programs and applications that are running in the background while you are downloading. This will considerably speed up the entire process. It is also advisable to set the downloads for a particular time, when you are not working on your machine; it means that there are no programs running in the background that can slow down the speed.

    5. DOWNLOADING TIME
    Sometimes there are more people trying to download the same file as you are, during a particular time of the day. If you find out that your download speed is slow down, then maybe you should just try at a different time. When there is less traffic, the download speed will be  higher.

    6. DOWNLOAD ACCELERATOR
    There are different free software downloads available over the Internet which are known as download accelerators. These manage the active downloads on your machine and also increase its performance during downloading process. These programs alter the way by which the machines resources are distributed which can help you in different ways.

    WHATSAPP:: How To Make WhatsApp Free For Lifetime

    WHATSAPP:: How  To  Make   WhatsApp Free  For  Lifetime

    As every one knows WhatsApp is the Fastest Growing Messenger for Mobile Phones. WhatsApp is highly downloadable mobile application now days. Every one who use internet on mobile always use WhatsApp, instead of using sms from number to everyone because sms needs to activate costly packs which offers limited messages but WhatsApp allow to send unlimited messages with good interface and inbuilt number of amazing features like sharing videos, images, audios or any other files as you want

    But the  Problem with Whatsapp is that its free subscription is just for one year. Means due to program policies of Whatsapp you can use it free for one year for every new installation. Then after completing 1st year you have to pay $0.99 to activate Whatsapp for next year. So here i will try to introduce amazing trick about making Whatsapp free after completing 1 year.

    I know $0.99  is little bit amount and everyone can easily afford to pay, So if your are not interested to do this then Just suggest you read it for fun because our aim is to increase your knowledge only.


    BELOW ARE STEPS TO MAKE WHATSAPP FREE FOR LIFE TIME .

    1. If you have any android phone or other mobile where you already install Whatsapp then i suggest you to  delete your account and uninstall Whatsapp  from your device.

    2. Now you need iOS device i recommend you to use iPhone for this. If you already then follow steps. if not Borrow it from you friend or any other person.

    3. Make sure that they do not  have already installed Whatsapp. If they do not having Whatsapp already then you need to download it from iTunes search like Whatsapp for free because iTunes Offers sometime free apps.

    4. Now Install Whatsapp in iOS. After the installation, Activate your mobile number and verify it.

    5. After the verification, now use your Activated number on your own device and Check your Service time it is extended to Lifetime.


    READ MORE ON WHATSAPP

    Whatsapp::15 Best Whatsapp Tricks and Tips


    WhatsApp::Whatsapp Lock for Android.


    WHATSAPP::How to install WhatsApp on PC/laptop


    ENJOY!!

    Monday, June 30, 2014

    Whatsapp::15 Best Whatsapp Tricks and Tips

    Whatsapp::15 Best Whatsapp  Tricks  and  Tips

    Whats app Messenger can be used to send pictures, videos, maps, audio or texts to anyone anywhere around the world free of cost. Only there has to be data connection by network provider or WI-Fi device.

    Now a lot of people have a tendency to know about various tricks regarding any app. So there are many
    Whats app Tips and trick as well.So Here are few of those WhatsApp TIPS AND TRICK

    BELOW ARE 15 WHATSAPP TIPS AND TRICKS

    1. There is a way to spy on someone else’s account in Whatsapp. All it needs to be done is that the Settings of the rooted phone have to be opened. Then the MAC address of phone’s Wi-Fi has to be noted.

    2. There is a trick to use Whatsapp without using a person’s number, this is done by tricking the verification request which is asked after installation of Whatsapp.

    3. The messages deleted by someone can be obtained by transferring the msgstore.db.crypt file to some other phone and restored in other phone’s Whatsapp.

    4. By using an app called Magiapp, one picture can be sent to another picture.

    5. Whatsapp does not allow anyone to download the profile pictures of others for different security reason, but actually these are automatically downloaded when one sees it, on the memory card.

    6. Those who love to prank, there is an app for creating fake conversation. It is done with the help of Whatssaid.

    7. There is a way to prank friends by changing their profile picture on a particular phone. A pictures’ name and resolution has to be changed and saved on phone.

    8. With Cloud Send, people can share PDF, APK, ZIP and DOC file on Whatsapp.


    9. With the help of Whatsapp plus, profile picture can be hidden or stopped from being downloaded.

    10. The Last seen feature of Whatsapp can be blocked by installing the Block Whatsapp last seen app.

    11. The automatic image download can be disabled by installing Whatsapp plus app.

    12. The Whatsapp free validation can be extended up to 2022 by installing Whatsapp with a number in two different phones, one iPhone and one android alternatively once.

    13. Multiple Whatsapp account can be maintained in a single rooted phone with SwitchMe multiple accounts app.

    14. Whatsapp can be used without SIM using the WLAN connection on phone.

    15. Whatsapp conversation can be hacked using Whatsapp Sniffer.


    WhatsApp::Whatsapp Lock for Android.

    WhatsApp::Whatsapp Lock for Android.

    This app will lets you protect your WhatsApp privacy through a PIN.

    After process installation it will ask you to insert a 4 digit PIN, and will show the configuration options to lock WhatsApp

    You can customize auto-lock time, so you do not need to enter the PIN every time you change task on your device .

    If you may enter a wrong pin and your phone has front camera, it will take a picture of the intruder within a very short of time and saved in the photo gallery.

    Have fun in detecting the intruder {Only devices with front camera}

    ★ It's free and it  has no limitations.

    ★ It keep your messages safe

    ★ It Capture intruders when wrong PIN entered. 

    ★ Customize autolock time

    ★ Do not make you crazy with strange advertising.
    ★ It is ultra lightweight. Uses low resources and space.

    ★ Minimun special permissions required

    ★ Design attractive and simple user interface.

    NOTE THAT: This application is not related to Whatsapp Inc.

    Saturday, June 28, 2014

    WHATSAPP::How to install WhatsApp on PC/laptop

    How to install  WhatsApp  on PC/laptop
    Most of the phones now days are using WhatsApp as one of the most used App. But now you can also use it in PC. This will not require for you to carry your phone at any time. You can enjoy its features in your PC or Laptop.

    You can install WhatsApp using Youwave, another great application to run Android Apps on PC. You will be able to download various Android Apps with it. This application offers you the latest edition Android ICS 4.0.4. You can also download Android free games with this App. This software also let you to import application to run in it. Youwave is not a free software, but you will get 10 days free trial.

    You will require minimum Intel Pentium 1.6 GHz CPU, 1.5GB DRAM, 500MB disk space. And windows XP,Vista, windows 7, windows 8, 32/64 bits.


    STEPS TO FOLLOW

    1.download Youwave and Install now.

    2. Run Youwave to open it Click view then Online content.

    3. Double click on online app {WhatsApp} to Install or browse the store.

    4. Now after the download, click view-apps. And double click to install WhatsApp.

    Finally you are done now with this simple steps to install WhatsApp.Then  Double-click to launch the WhatsApp in your PC or Laptop.

    Now choose to Agree and continue. After that follow the steps as the same thing you do on cell-phone. You have to give your country code and phone number .

    After you finish all this things import all your contact in PC  and are ready to go live. You can have the fun with your WhatsApp now.

    WHATS APP::How to Create a Shortcuts for Important Contacts

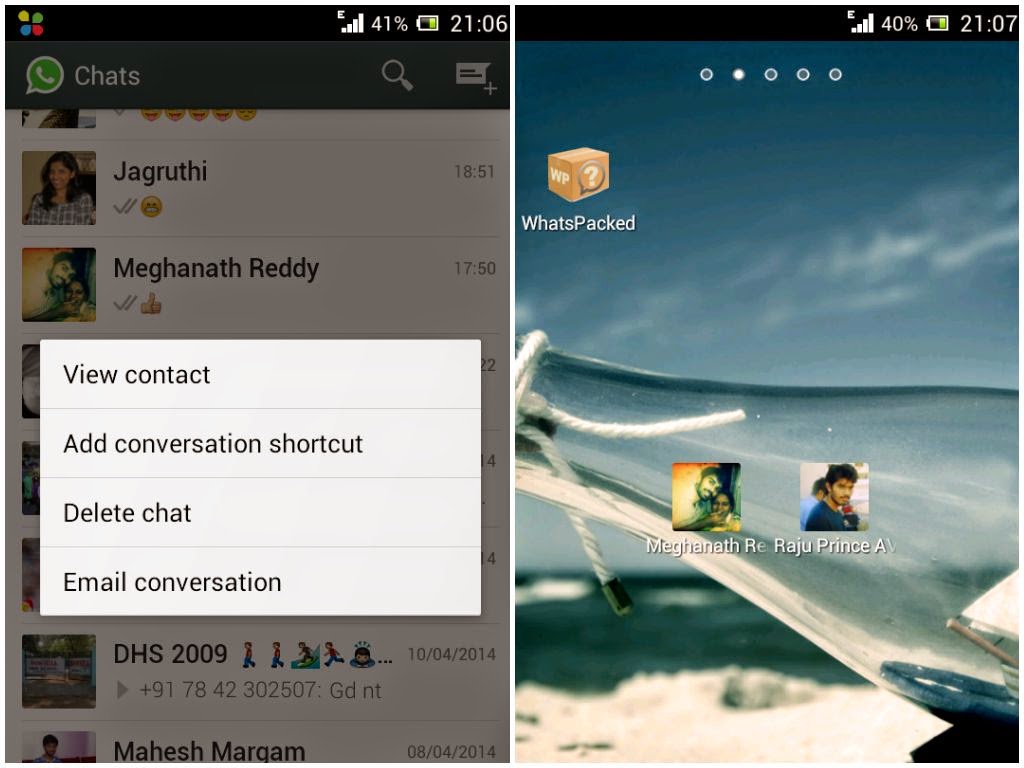
    Here is a simple trick on how to create a shortcut for Whats App contacts. when using Android phones you can easily create a shortcut for a Group or a Contact by having a long press on it. A tab will pop up and then select add conversation shortcut.A shortcut will be created for any contact or group.

     WHATS APP

    But it is not easy in case of IOS so for that you need to install a third party application which called 1TapWA to get this feature. This app also has some extra features like photo editing and action scheduler.

    WHATS APP::Change Your Mobile Number on WhatsApp without losing any chat history.

    Do you want to change your SIM Card and then continue with the same Phone there is no need to uninstall and reinstall Whats App to change Whats App number.

    Change  Your Mobile  Number on WhatsApp without  losing any  chat history.

    There is a default option available on Whats App to change mobile numbers. For that go to Settings then Account and Change number. Enter both old and new phone numbers and click Done.
    Now you already verify your new number all the Groups, messages will be migrated to your new Phone number.

    WHATS APP::How toHide your Mobile number in WhatsApp Groups.

    How toHide your Mobile number in WhatsApp Groups

    If you want to keep your mobile number disclose to others in whats app then this is simple trick for you.
    Follow the steps below.

    1. First of all you need to uninstall and reinstall WhatsApp on your Android Phone.

    2. In the step of verification,you have to put your mobile in flight mode or change the message center number.

    3. Select Verify through sms and enter your email id and then Click on send. Now Without wasting a second, click on Cancel. This will terminates the authorization process.

    4. Now you have to spoof that message, for that download Spoof Text message.

    5. Now go to your Outbox and then Copy the message details of Spoof App then send it to Spoofed Verification

    6. Use the below details
    To: +447900347295
    From: +(Country code)(mobile number)
    Message: Enter you email id

    Now a message will be sent through that spoofed number and that Spoofed number is visible to all others instead of your original mobile number.

    Thursday, June 26, 2014

    how to Format s60 Phones

    how to Format  s60  Phones
    You can quick format your phone and you can full format.
    To quick format goto tools/ settings/general resore Factory Settings. To full format go on standby scree and put in this code: *#7370#
    this will leave you with nothing on your phone except nokia
    software. I will advise you keeP your phone on charge while
    doing this in case of not finishing its re-format.
    A Soft-reset - the process of resetting all the settings of the
    phone to the factory default No applications are deleted! A
    Hard-reset is like formatting a drive It does format the
    memory. Everything that has been
    installed after the first use of the phone is deleted!
    It will recover the memory of the phone to the state you
    purchased iT

    Tuesday, June 24, 2014

    5 Steps on How to protect your cell-phone from viruses / MOBILE PHONE TIPS AND TRICKS

    5 Steps on How to protect your cell-phone from viruses / MOBILE PHONE TIPS AND TRICKS

    1. Always keep your Bluetooth off unless required or it is most preferable to keep your handset to hidden mode unless you need it to be visible.

    2. When you have forgotten to switch-off your Bluetooth  remember not to open any Bluetooth messages or files sent by unknown source they are most likely viruses.

    3. Only download content from trusted sources, trusted sources include operator portals and other well-known websites that offer adequate protection against viruses.

    4. Always install an anti-virus software in your phone do not forget to keep it updated as new viruses and threats always arise.

    5. Never lend your memory card to anyone. It might get infected if the person to whom you have lent you MMC has infected his phone and he/she inserts your card in his phone. Also remember not to insert someone else's MMC in your handset since there are chances of his MMC containing a virus or malware.

    Steps on how to repair and fix a water damaged mobile phone / MOBILE PHONE TIPS AND TRICKS

    Steps on how  to repair and fix a water damaged mobile phone / MOBILE PHONE TIPS AND TRICKS

    1. First remove the battery immediately and do not try to switch off the handset. NOTE. The removing of the battery is a must

    2. Now dismantle your cell phone carefully. To open your cell phone you need a torx T6 size screw driver and a tweezers. You have to remember the steps how you opened the phone as you will have to assemble it later

    3. Dry the circuit board carefully and completely using a hair drier or you can also dry it in sunlight.

    4. Dry the spare parts and components carefully and be careful with the LCD as it is very delicate.

    5. Clean the circuit board with spirit using a brush this will prevents corrosion on the PCB.

    Now reassemble your mobile phone carefully and if all goes well your mobile phone should switch on without any problem. If it fails to switch on you may charge your handset and try it again and if it does not switch on now you will have to get your phone repaired at a service center.

    Acer V 750 secret codes / ACER / MOBILE PHONE TIPS AND TRICKS

    Acer V 750  secret  codes  / ACER / MOBILE PHONE TIPS AND TRICKS

    *#400# Display Adc/ Set Cal-Value

    *#402# Set LCD Contrast

    *#403# Display Errors Info

    *#300# Display Info Hw and Sw

    *#301# Menu Test

    *#302# Menu Acoustics

    *#303# {Settings saved} Set English language

    *#307# Menu Engineering

    *#311# Reset Phone Code  [ Also reset Security Codes  ]

    Saturday, June 21, 2014

    How to Make Icons Display More Quickly on the Taskbar ..!!

    How to Make Icons Display More Quickly on the Taskbar ..!!
    The task bar provides a simple shortcuts to most used items and allowing user to simply click on an icon and open the associated program. When you hover your mouse over an icon, you can easily see what that icon is and what it does.

    Unfortunately  those descriptions can be slow to appear sometimes and that can reduce your productivity and increase the amount of time it takes to open your programs. If you are having this kind of problem  you can tweak Windows 7 to make those thumbnail descriptions display much more quickly. Just follow these simple steps to make the taskbar easy and more useful.

    Click Start button and type regedit in the Search box. This will open the Windows Registry. NOTE THAT:: you should always back up the registry before you make any changes.

    Navigate the registry and go to the HKEY_CURRENT_USER\Control Panel\Mouse section Highlight the Mouse Hover Time setting and double-click it.

    Lower the number in the box to display the thumbnails easily and more quickly. The default setting is 400 milliseconds, but also you can choose any number you wish – 150 milliseconds is a good one.

    After you are done making the change  simply click the red X to close the registry editor and see the results of your tweak.
     

    ONE TECHNO Copyright © 2012 Fast Loading -- Powered by Blogger